
5 Easy Steps To Hire A Website Designer
April 12, 2024
The Beginner’s Guide to Website Sitemap
April 12, 2024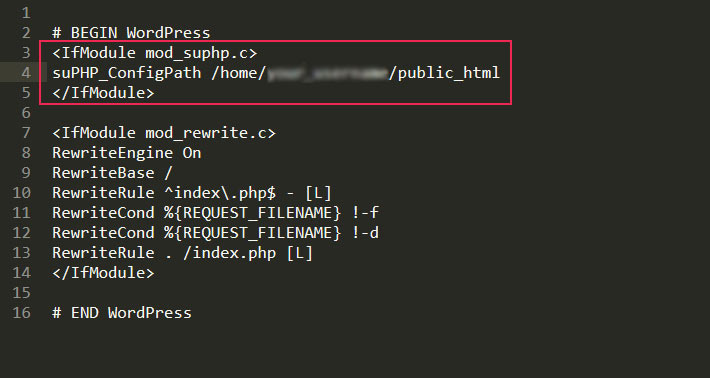
Disclosure: This content material is reader-supported, which suggests should you click on on a few of our hyperlinks that we could earn a fee.
You’ll be able to’t have a profitable web site with out visible content material, together with a great mixture of photos, icons, and graphics, with rigorously thought and written textual content is the right mixture to spice up visitors.
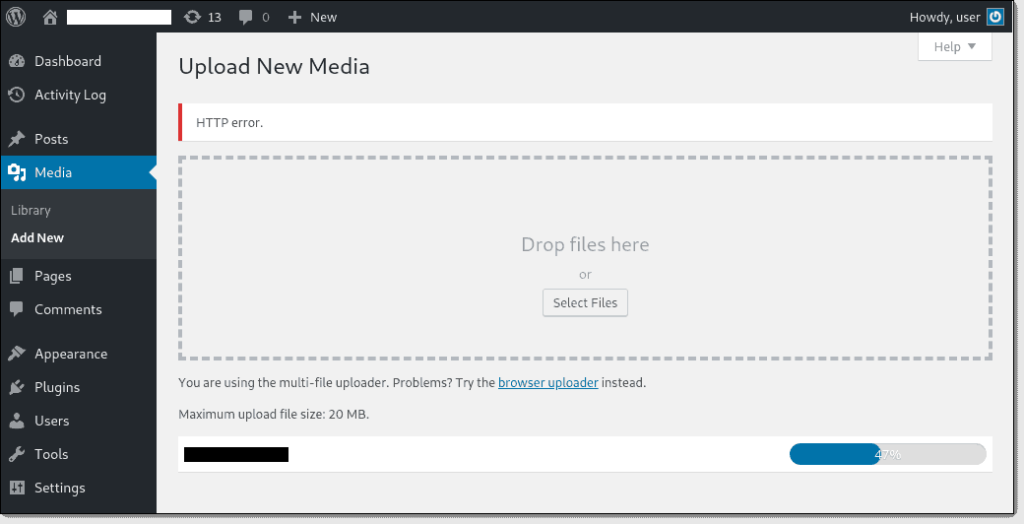
Nevertheless, should you see an HTTP error, you gained’t have the ability to add photos to WordPress.
What does that imply, you ask?
The HTTP error is a code that signifies one thing went flawed throughout the importing course of. Now, fixing this error could sound sophisticated, however that basically isn’t the case.
On this information, we’ll present you how one can repair an HTTP error when importing photos to your WordPress web site within the best doable manner.
Let’s start.
Why Fixing an HTTP Error When Importing Photos to WordPress Is Necessary
In case you assume web site photos are solely a “nice-to-have” factor, assume once more.
They achieve this far more than serving eye sweet. When used successfully, photos can deliver in additional guests to your web site, encourage social sharing, and, in the end, provide help to enhance your gross sales and visitors.
Even consultants have discovered that on-line content material with photos will get 94% extra views than net pages with out photos. This is sensible as people are extremely visible creatures. Not solely do photos appeal to our consideration, however additionally they draw us in by sparking feelings.
Enhanced person expertise is one other profit. Including photos in your web site presents necessary info in a extra digestible method. Therefore, your guests usually tend to keep in your web site for longer and have a better likelihood of changing into an inquiry or sale.
However that’s not it!
Web site photos additionally profit your indexing on search engines like google. The captions you label your photos with may be good for search engine optimisation—supplied you add related key phrases and the outline is a real illustration of the picture.
Sounds nice, proper?
However to get all these benefits, you might have to have the ability to add photos to your web site. Exactly why it’s essential to repair the HTTP error immediately.
The Funding Wanted to Repair an HTTP Error When Importing Photos to WordPress
Right here, we’ll focus on the financial and time funding you have to be ready for when making an attempt to repair the HTTP error when including web site photos.
A number of causes can result in an HTTP error whenever you attempt importing information by way of the WordPress media uploader. Nevertheless, what makes issues worse, is the vagueness of the message.
You haven’t any clue about what could have prompted it. Even WordPress can not work out the trigger (that’s why it shows the generic HTTP error message).
Your solely possibility is to check out numerous options to search out the trigger after which repair the error.
That is the place the entire course of can get very time-consuming. It may well take you a few minutes to some hours, relying on how briskly you determine and repair the issue.
As for the monetary side of fixing the HTTP error when importing photos, there may be not a lot so that you can fear about. You’ll be able to attempt the completely different steps your self, and should you get caught someplace, contact your internet hosting supplier’s buyer assist for assist.
The entire strategy of fixing an HTTP error when importing in WordPress may be solved by following 5 easy steps. Right here’s what you could do:
- Step 1 Discover Out If the HTTP Error is Non permanent
- Step 2 Rename Your Recordsdata
- Step 3 Add Code to Modify WordPress Picture Editors
- Step 4 Deactivate Your Web site Plugins
- Step 5 Enhance Your Server Reminiscence
Let’s check out these steps in additional element.
5 Steps to Repair an HTTP Error When Importing Photos to WordPress
Let’s now give attention to the entire level of the article: Fixing the HTTP error.
Word: You don’t need to attempt the remaining options if the error message goes away after you try a particular methodology. In case you’re fortunate sufficient to resolve the issue on the primary attempt, then that’s it! You’re accomplished.
Step 1: Discover Out If the HTTP Error is Non permanent
The HTTP error may be non permanent when brought on by uncommon visitors and low server sources—one thing that’s mechanically mounted on most WordPress-specific internet hosting servers.
It’s why you need to wait a couple of minutes and check out re-uploading your picture file.
In case you discover the add failing once more, attempt to add a smaller picture of the media file. If the add completes with none errors, you’ll know the picture dimension was the difficulty. In such instances, you’ll be able to cut back the size of the unique picture. Altering the file format is an alternative choice.
In case you’re nonetheless going through issues, you’ll be able to attempt refreshing your net web page earlier than re-uploading the picture. In case your login session has expired, observe the steps beneath:
- Go to your admin dashboard, and log in once more by typing in your username and password.
- Refresh the web page by urgent both the Reload button or the F5 key in your keyboard.
- Re-upload the picture to see if it really works.
Attempt switching your net browser should you’re nonetheless going through points. As an illustration, should you use Google Chrome, attempt Firefox. Google Chrome, particularly, is understood for having points with picture add, so it’s greatest to offer different choices a attempt.
Attempt to add your picture once more after altering your browser.
If the HTTP error doesn’t go away, transfer on to the following step.
Step 2: Rename Your Recordsdata
Now you recognize the HTTP error is everlasting. However earlier than diving into the extra elaborate options, attempt fixing the most typical but ignored causes for the error: incorrect file names.
When naming your file, stick with utilizing letters, numbers, and dashes. In different phrases, keep away from particular characters (equivalent to apostrophes, equal indicators, and so forth) and worldwide language symbols.
Top5webhost Tip: Create a file naming system. As an illustration, you’ll be able to add underscores between phrases and a hyphen and a quantity on the finish (Eg: my_image-1.png, my_image-2.png, and many others.).
However how do you discover out whether or not an incorrect file identify is inflicting the issue?
Rename the file in your native folder utilizing the rules we talked about above. Add the renamed picture or media file. In case you discover the error message isn’t seen anymore, you’ll know an incorrect file identify was inflicting the difficulty.
Nonetheless seeing an error? Transfer on to Step 3.
Step 3: Add Code to Modify WordPress Picture Editors
WordPress has two picture editor modules: GD Library and Imagick.
Out of the 2, Imagick causes reminiscence drain, which, in flip, may end up in the HTTP error throughout picture add. It is because the editor makes use of a number of threads to enhance picture processing.
You might also need to deal with restrictions on a number of shared hosts, which might once more trigger the HTTP error.
Naturally, you’ll wish to make GD Library the default picture editor.
There’s a easy manner to make sure GD Library is all the time used as the primary picture add possibility. All you must do is add the next code on the finish of the file into capabilities at your theme’s PHP:
operate wpb_image_editor_default_to_gd( $editors ) {
$gd_editor = ‘WP_Image_Editor_GD’;
$editors = array_diff( $editors, array( $gd_editor ) );
array_unshift( $editors, $gd_editor );
return $editors;
}
add_filter( ‘wp_image_editors’, ‘wpb_image_editor_default_to_gd’ );
The opposite possibility is to drive Imagick to make use of a single thread for picture processing as a substitute of a number of threads. If you wish to proceed with Imagick as a substitute of GD Library, you must insert this line of port into your .htaccess file:
SetEnv MAGICK_THREAD_LIMIT 1
After you’ve modified the picture editors, attempt re-uploading the file picture. In case you nonetheless see the HTTP error, transfer on to Step 4 after eradicating the code you simply added to the capabilities.php file.
Step 4: Deactivate Your Web site Plugins
Deactivating a number of of your plugins and switching your WordPress theme to default can repair an HTTP error when importing photos to WordPress. However earlier than you begin with the precise deactivation and switching, you need to clone your stay website to a staging surroundings.
This manner, any adjustments you make to your cloned web site gained’t mirror in your foremost WordPress web site. Right here’s the way to go about it:
- Open your WordPress dashboard and choose Plugins.
- Hover your cursor over the Bulk Actions tab on the prime of your display, and click on on Deactivate. All of your plugins will get disabled, however you gained’t lose any information.
- Verify whether or not the HTTP error is resolved. If sure, you must perform the following set of steps to search out the glitching plugin.
At this stage, all of your WordPress plugins are deactivated. Your goal now could be to activate them—one after the other—when you attempt importing your picture. Once you see the HTTP error return after activating a particular plugin, you’ll know the offender.
When you’ve noticed the rogue plugin, you’ll be able to both submit a assist ticket within the WordPress repository, or you’ll be able to contact the plugin developer on to resolve the difficulty.
Step 5: Enhance Your Server Reminiscence
You require an enough reminiscence restrict to add information efficiently. It’s why inadequate reminiscence is likely one of the most outstanding causes for the HTTP error.
Earlier than you can begin growing your server reminiscence, maintain a watch out for 2 issues:
- Ensure you have applicable internet hosting bundle limits. You‘ll see an inner server error (error 500) should you lengthen reminiscence utilization previous these limits. To keep away from these issues, it’s essential to join with a dependable internet hosting supplier that gives tailored WordPress plans.
- You need to have an FTP shopper to edit information.
There are alternative ways in which you’ll enhance your server reminiscence. Under, we’ve compiled a listing of some of them:
Methodology A: Edit the wp-config.php File
One of many best methods to extend the reminiscence restrict is by modifying the wp-config.php file. All that you could do is add a single line of code:
outline( ‘WP_MEMORY_LIMIT’, ‘256M’ );
Methodology B: Edit the .htaccess File
The .htaccess file is a server configuration file discovered within the root WordPress listing. You’ll be able to entry this folder by enabling the related choices to point out hidden information inside your FTP shopper.
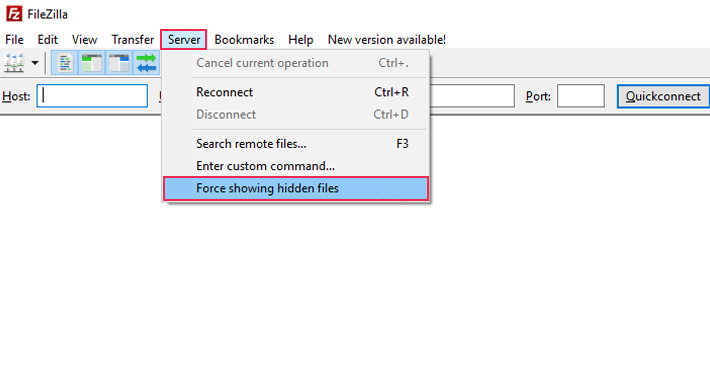
FileZilla, for one, is likely one of the greatest FTP purchasers. In case you too determine to make use of it, right here’s what you could do:
- Go to the Server tab.
- Choose Drive exhibiting hidden information.
- Seek for memory_limit, and alter the worth related to it.
- In case you don’t see any code current, add the next line: php_value memory_limit 256M
Methodology C: Edit the php.ini File
The php.ini file is within the WordPress root listing. You need to open the file, seek for memory_limit, after which change the worth related to it to spice up your reminiscence restrict.
In case you don’t discover the php.ini file, you’ll need to create one. As soon as that’s accomplished, enter the next code:
memory_limit = 256M
For shared internet hosting customers, the steps are barely completely different.
Right here, you must edit the .htaccess file earlier than altering the memory_limit worth. It is because shared internet hosting typically has a number of php.ini information, which is why it’s essential to specify the precise location of the file created or edited by you.
To edit the file, merely add the next go to the .htaccess file in direction of the highest:
<IfModule mod_suphp.c>
suPHP_ConfigPath /residence/your_username/public_html
</IfModule>
Keep in mind, it’s essential to exchange your_username together with your precise cPanel username.

Methodology D: Change the Reminiscence Restrict Worth Inside the cPanel
Login to cPanel, and scroll right down to the Software program discipline.
Click on on MultiPHP INI Editor. From there, you’ll be able to select your area from a displayed possibility. Seek for memory_limit. Sort in 256M as a substitute of 32M as the worth.

This could immediately enhance the reminiscence restrict.
Subsequent Steps
When you’ve succeeded in fixing the error, listed below are a number of different Top5webhost guides that will help you enhance your web site efficiency:
