
What is Reputation Automation All About? The Complete Guide
March 25, 2024
11 Examples of Blog Topics and Ideas
March 25, 2024
For images fanatics, beginning a weblog could be a good way to construct a neighborhood, develop a repute as a photographer, and even earn a living. Or it could simply be an off-the-cuff pastime. Both manner, it needs to be enjoyable, however many individuals don’t do it as a result of they assume beginning a weblog is difficult.
With the appropriate instruments, although, beginning a weblog could be quick and straightforward, particularly in the event you use a running a blog platform like Hostinger that can assist you arrange your area and WordPress. On this information, we break down easy methods to arrange the tech, the content material, and the visuals for a images weblog, all in simply 10 simple steps.
Top5webhost’s Favourite Instruments for Beginning a Pictures Weblog
Beneath you’ll discover our Golden Eggs, one of the best running a blog platforms for brand new bloggers we’ve chosen based mostly on all of the choices we researched for our detailed assessment.
WordPress with Hostinger is the most suitable choice for brand new bloggers as a result of it integrates straight with WordPress and is straightforward to make use of, even with out expertise. Proper now, you may get began with a plan for simply $1.99 a month.
Wix is a superb choice for a visually putting and easy website, with plenty of templates and nice pricing plans. You may get began right here at no cost, no bank card required.
Strikingly is an efficient alternative for photographers who need to get artistic with their web site theme and promote pictures utilizing the integrations. You’ll be able to create your first website right here in minutes at no cost.

Extra Prime Running a blog Platforms and Weblog Websites
We’ve spent hours testing and reviewing all one of the best running a blog platforms on the market, and we’ve put collectively an in depth assessment of our favorites. Everybody has completely different targets after they begin a weblog, so try the complete listing to see the completely different options and select one which works for you. See our full listing of running a blog platforms right here.
Step 1: Get Signed Up With WordPress on Hostinger
The very first thing you’ll have to do earlier than you begin your images weblog is to arrange hosting and WordPress.
Should you head over to Hostinger’s dwelling web page, you’ll be able to join an account by clicking on Internet hosting within the menu bar after which WordPress Internet hosting.
Subsequent, select your internet hosting plan. Hostinger typically does reductions and gross sales on their plans all year long, so verify to see if there are any offers on provide.
We suggest selecting the WordPress Starter Pack since you’ll get entry to a free area for the primary yr, and it has every thing you want as a brand new blogger.
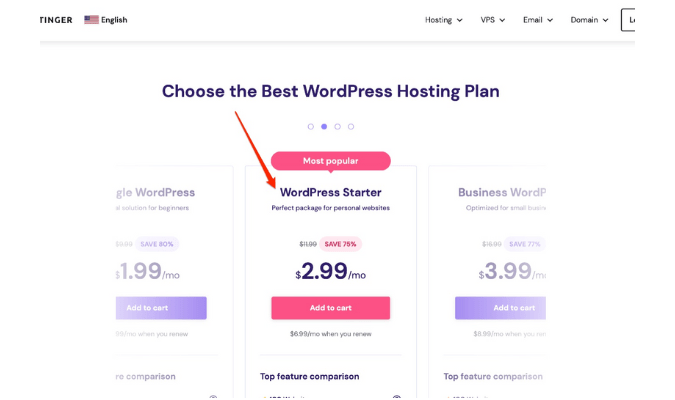
Then, add your option to the cart, and select what number of months you need to subscribe for. The longer your plan, the extra of a reduction you’ll get, however you would possibly need to keep on with one yr, as you don’t know in case your weblog goes to be a hit.
Subsequent, add your fee data and buy your plan.

Now you’re able to get began with WordPress and arrange your weblog. You’ll be able to log in to your Hostinger account and your dashboard, the place you’ll see your plan and the choice to Set Up.
We’ll go over that in just a few steps. However first, there are just a few different issues we have to do.
Step 2: Select a Area of interest
Earlier than you’ll be able to arrange your weblog, it is advisable do some planning.
This contains understanding what your area of interest is and who your audience is. Though a images weblog is already, in itself, a distinct segment, it’s nonetheless a really broad class. If you’d like your weblog to achieve success, it is advisable get clearer on who your audience is.
For instance, you possibly can concentrate on instructing individuals images, taking photographs of wonderful landscapes, or need to assessment cameras and gear. The clearer you may get in your area of interest and sub-niche, the simpler it is going to be so that you can construct a recognizable model and develop your viewers.
After you’ve determined in your area of interest, it is advisable take into consideration who may be fascinated by it. If you’re instructing images, for instance, you would possibly goal new and youthful photographers. Should you’re reviewing gear, you would possibly goal extra skilled and/or skilled photographers.
The extra you realize about your viewers and your area of interest, the simpler it is going to be to model your weblog and market your self on social media. When you’re clear in your area of interest, transfer on to Step 3.
Step 3: Select a Weblog Title
After getting a distinct segment in thoughts, you’ll be able to select your weblog title. This will even be your area title, and it’s how individuals will discover you on-line.
You need to select a superb title that displays your area of interest and model, however there are different issues to think about.
Listed here are the principle stuff you need to take into consideration when selecting a weblog title:
- Select a reputation that’s related to images and to your area of interest (this will even be your individual title, particularly if you’re showcasing your images)
- Select a reputation that’s quick and straightforward to recollect
- Select a reputation that’s simple to kind and straightforward to spell
- Select a weblog title that has an obtainable area and social media handles
- Select a .com area title as a result of it’s simpler to monetize and appears extra skilled
Hostinger really has a site title search that can let you know in case your area is offered or not.

It may be tempting to make use of a site title that’s much like one other weblog in the event you actually just like the title and it’s obtainable. Keep away from doing this, although, as a result of if you wish to monetize your weblog, you may get into points with copyright in case your title is simply too near another person’s, particularly if they’ve trademarked theirs.
Selecting a particular, distinctive title at the beginning will make it simpler so that you can construct a recognizable and distinctive model.
When you’ve selected a site title and realize it’s obtainable, go to Set Up in your Hostinger dashboard and declare your free area. Then, select Construct a New Web site and transfer on to the following step.
Step 4: Set Up Your Web site and Activate Your SSL
Now that you simply’ve carried out the groundwork in your weblog, you’re prepared to truly arrange your website.
In your Hostinger Setup, when you’ve chosen Construct a New Web site, you’ll be requested to decide on a internet hosting platform. Select WordPress, after which create a Login and Password in your WordPress Account.

You’ll be able to then select a theme or a structure. Use the search bar to search for weblog layouts. You’ll be able to edit your structure later and alter your theme, however beginning with a template will make every thing a lot simpler, particularly as a brand new blogger.
When you select your theme, you’ll get to a web page that claims your website is prepared. Earlier than you go to your WordPress Dashboard, although, you’ll need to ensure that your SSL certificates is put in. Go to the choice that claims Management Panel and click on Handle Web site.

If it is advisable arrange your SSL, you’ll see a yellow button that claims End Area Registration. Click on on it. You’ll then simply want so as to add all of your particulars like title, deal with, telephone quantity, and many others. When you’re completed, click on Set Up, after which Proceed to Management Panel.
Subsequent, head to the Internet hosting part of the highest menu bar and choose Handle subsequent to your web site. You’ll be taken to the Internet hosting Account web page, and it is advisable scroll by means of the completely different choices and icons till you attain the superior part, the place you’ll see the SSL icon. Click on on it.

Then click on Set Up, then Activate, then Set up. Your website is now arrange and able to be personalized. When you’ve completed this step, transfer on to the following one.
Step 5: Set Up Your Social Media
Earlier than you really begin enhancing your weblog, you must arrange social media, so nobody has an opportunity to take your handles.
For a images weblog, you need to concentrate on photo-heavy social media platforms, like Instagram and Pinterest, as a result of your viewers is extra prone to be hanging on the market. You’ll be able to arrange skilled accounts on most social media, which gives you insights into your statistics and the way your viewers interacts along with your posts.

With an expert account, you can even add your weblog on to your profile when you’ve acquired it up and working.
When you’ve created social media accounts in your weblog, you’ll be able to return to your Hostinger Dashboard and transfer on to Step 6.
Step 6: Customise Your Weblog
Now that you simply’ve gotten all of the technical setup out of the way in which, you’re prepared to begin enhancing your weblog.
Should you use a template to set it up, you’ll be able to go and take a look at your website by typing in your URL. This gives you an thought of what you do or don’t like concerning the template to this point, and what you need to change.
Subsequent, go to your WordPress dashboard by including /wp-admin to the top of your URL. From right here, you’ll be capable of edit your weblog, select a brand new theme, and add plugins.
Should you go to Look, you’ll have the choice to decide on a brand new theme. You don’t have to do that, however in the event you don’t like several of the themes that had been instructed with Hostinger, you’ll be able to select a theme right here.
You do even have the choice to buy a premade theme by means of WordPress or by means of a 3rd occasion after which add it. You don’t have to do that, but it surely gives you extra choices relating to having an aesthetic weblog, and for images, you would possibly need to select one thing visually putting to showcase your photographs.
You’ll find plenty of lovely themes on websites like Etsy which you can then add into WordPress. If you buy the theme, they’ll offer you detailed directions on easy methods to add your theme to your WordPress website.

No matter which theme you select, you also needs to be capable of replace the colours and fonts to make them extra private to you and constant along with your model. You too can add your individual images and actually showcase your greatest work.
When you’ve personalized your weblog’s look, transfer on to Step 7.
Step 7: Add Copy To Your Weblog
When you’ve arrange your weblog’s theme, it is advisable go forward and replace the copy in your weblog.
This simply means including content material to your weblog (excluding the weblog posts, which we’ll cowl later.)
Your template won’t include any copy included, so selecting what to put in writing would possibly require some analysis. You’ll want so as to add content material to your homepage, welcoming individuals to your weblog, and also you’ll additionally want so as to add content material to your About Web page and your Contact Web page.
To get an thought of what copy you need to add, check out a few of your favourite blogs for inspiration. What sort of content material do they embrace on the homepage? What do they are saying about themselves on their about web page? What sort of CTA’s have they got on the buttons?
Clearly, you’ll be able to’t copy and paste something. However you CAN use different blogs simply as inspiration on what sort of issues you’ll be able to write. Don’t be scared to let your persona shine by means of in your copy since you need your viewers to get a really feel in your voice and really feel extra related with you.
When you’ve added copy to your whole pages and checked the grammar utilizing a free software like Grammarly, you’ll be able to transfer on to Step 8.
Step 8: Add Plugins
The subsequent factor it is advisable do is select some plugins to add to your weblog.
Plugins are instruments that you simply add or add to your weblog that enable you to add options like electronic mail subscriber varieties, blocking spam feedback, or optimizing website pace. If you first arrange WordPress, some plugins may need already been included.
To see your plugins, go to your WordPress dashboard and choose Plugins. You’ll then see a listing of the plugins you have already got and a button on the high of the web page that claims Add New.
Should you click on that, you’ll be able to search plugins or Add Plugins when you have downloaded any.

There’s no set rule on which plugins you want, but it surely’s a good suggestion to incorporate:
- A plugin that blocks spam, like Akismet Anti-Spam, to keep away from annoying feedback on all of your posts
- A plugin that caches your website and optimizes pace, like WP Quickest Cache.
- A plugin that backs up your website, like Updraft, so that you simply by no means lose something
- An search engine marketing plugin, like Yoast search engine marketing, that can assist you optimize your posts.
- A plugin like Cookie Discover lets individuals decide in or out of cookies.
Some other plugins you add are as much as you and can rely upon what options you need to add to your weblog. If you’d like assist selecting plugins, we’ve reviewed one of the best WordPress plugins right here.
After you’ve added your plugins, you’ll be able to transfer on to the following step.
Step 9: Add Authorized Pages
The penultimate step for beginning your images weblog is so as to add authorized pages. These are pages which are required by regulation on any web site and embrace issues like a Privateness Coverage and Phrases and Circumstances.
A Privateness Coverage lets customers understand how their knowledge is dealt with and which third-party plugins they’re utilizing and would possibly share their knowledge with. That is required by regulation in lots of nations and states, so be sure to add the hyperlink to the web page someplace clear, like your footer menu.

Phrases and Circumstances are additionally required by many nations, and these simply let your viewers know what guidelines you’ve in your weblog, like how previous somebody needs to be to entry it, or whether or not any of your pictures can be found for public use.
That can assist you draft these pages, you’ll be able to simply use a generator like Termly, or Phrases Feed to get templates. Nevertheless, as a disclaimer, these usually are not the identical as getting official pages drawn up by a lawyer, and if you wish to ensure your authorized pages are appropriate, you must at all times seek the advice of with a authorized skilled.
When you’ve set your authorized pages up and added them to a menu that’s simple to seek out, like your footer menu, you’ll be able to transfer on to the final step!
Step 10: Plan Your First Few Posts
The final step is to truly begin creating content material!
It’s higher to attempt to get 5-10 items reside on the weblog earlier than you begin selling it on social media or advertising and marketing it.
That is the enjoyable half since you get to sit down down and plan concepts based mostly in your market analysis and area of interest about what posts you need to write. A great way to plan is to begin with one matter and create a map of posts which are associated to it for the opposite items of content material, so you can begin constructing hyperlinks.
For instance, in the event you write one weblog submit about utilizing the handbook settings on a digicam, you possibly can write one other submit about easy methods to use a tripod to take away blur on handbook photographs. These posts can then hyperlink to one another, making your viewers keep in your website longer and making it simpler for them to navigate between posts.
When you’ve deliberate a minimum of three posts, you lastly get to sit down down and write them. Remember to edit them just a few occasions and add some high-quality photographs to make the textual content simpler to scan earlier than you add them onto your weblog.
To add the posts, simply go to Publish in your WordPress dashboard, and Add New. Then, edit them within the WordPress editor, and publish the posts. And then you definitely’re carried out. Congratulations! You’ve formally began your very personal images weblog.
